25 Brilliant Christmas Craft Ideas Using Recycled Cardboard
Do you have any plans for the next Christmas? Why not transform everyday cardboard into festive masterpieces?
Recycling cardboard not only reduces waste but also sparks creativity, making your holiday decorations extra special.
From whimsical ornaments to adorable gift boxes, these DIY projects will brighten your home and bring joy to your loved ones.
#1. Charming Gingerbread Cardboard Cottage
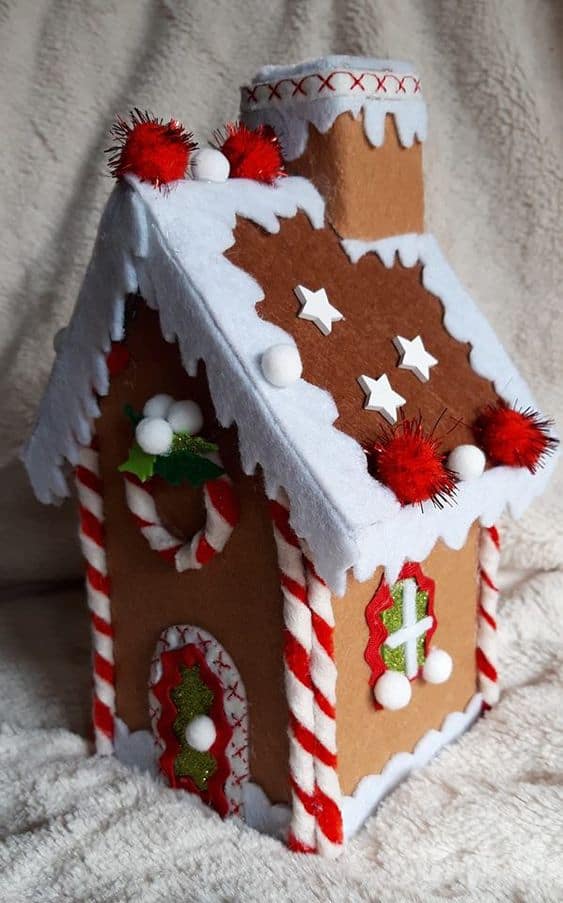
I absolutely adore this charming gingerbread cottage. Adorned with festive candy-cane stripes, and playful materials, it creates an enchanting, cozy Christmas atmosphere.
Supplies
- cardboard
- brown felt or paint
- white felt
- red and white twisted pipe cleaners or ribbon
- small white pom-poms and red pom-poms
- decorative stars, glitter, or foam shapes
- hot glue gun or strong adhesive
- scissors
Instructions
- Cut and assemble the cardboard into a simple house shape, including a roof and chimney. Secure with glue.
- Cover the cardboard structure with brown felt or paint it brown to resemble gingerbread.
- Cut white felt to mimic icing drips and glue it along the edges of the roof, windows, and door.
- Attach red and white pipe cleaners or ribbon along the edges to look like candy canes. Add white and red pom-poms and other decorative items, like stars or glitter.
#2. Whimsical Recycled Reindeer Wreath
The clever use of cardboard for the reindeer head, complete with a bright red nose, adds a delightful and eco-friendly charm to any holiday setting.
Supplies
- sturdy cardboard
- red pom-pom
- white ribbon or strip of fabric
- greenery wreath (optional, for a festive background)
- pencil
- scissors or box cutter
- hot glue gun or strong adhesive
- black marker
Instructions
- Draw the outline of a reindeer head, including antlers, on the cardboard. Cut out the head and antlers, making sure the antlers are separate pieces that you can attach later.
- Assemble the pieces, gluing the antlers to the back of the reindeer’s head.
- Glue a red pom-pom onto the nose area and draw a small dot for the eye.
- Attach a white ribbon or fabric strip around the neck area as a collar.
- (Optional) Mount the reindeer head in the center of a greenery wreath to enhance the holiday look, then hang it as a unique wall decoration.
#3. Eco-Friendly Cardboard Christmas Tree
Simple yet charming, this this cardboard Christmas tree offers an environmentally friendly alternative for festive decor while still capturing that holiday magic.
Supplies
- large cardboard sheets
- pencil
- scissors or box cutter
- ruler
Instructions
- Draw two identical tree shapes on the cardboard. Each shape should have a flat base for stability and a slot in the middle to allow the pieces to interlock.
- Cut out the two tree shapes. On one piece, cut a slot from the top to the middle; on the other, cut a slot from the bottom to the middle.
- Slide the two pieces together through the slots, forming a 3D tree structure that stands upright.
#4. Adorable Reindeer Cardboard Craft
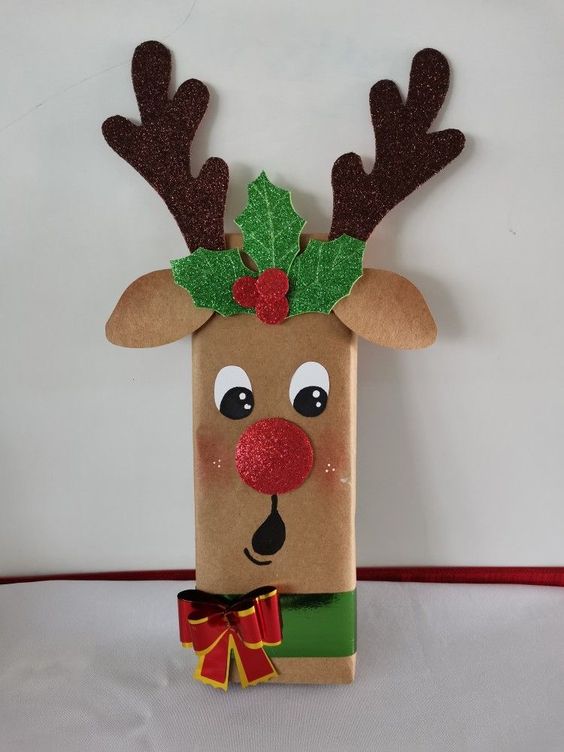
You’ll fall in love with this charming recycled reindeer craft! Its sparkly antlers and bright red nose make it perfect for spreading Christmas cheer.
Supplies
- small cardboard box
- brown paper or paint
- colored paper (red, green, black, white, and brown)
- glitter
- scissors
- glue
- small ribbon bow
Instructions
- Cover the cardboard box with brown paper or paint it brown to resemble a reindeer face.
- Cut out antlers from brown paper, holly leaves from green paper, and circles for berries and the nose (red) and eyes (white and black).
- Glue the antlers to the top of the box, then add the leaves and berries below the antlers.
- Attach the eyes, nose, and draw a small mouth below the nose. Add glitter to the nose and holly for a festive touch.
- Finish with a small bow at the bottom.
#5. Sweet Reindeer Lollipop Cardboard Craft
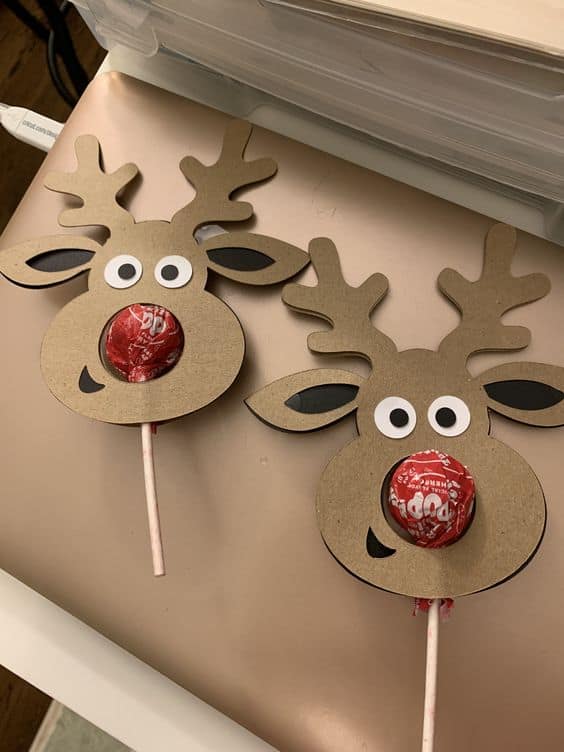
Your children will absolutely adore this creative and sweet reindeer craft! Made from recycled cardboard, each reindeer makes a fun, eco-friendly, and tasty Christmas project.
Supplies
- recycled cardboard or cardstock
- lollipops
- googly eyes or white paper
- black marker or black paper
- scissors
- glue
Instructions
- Cut out reindeer shapes from the cardboard, making sure to leave a round area in the center where the lollipop will fit as the nose.
- Glue googly eyes above the nose area or use white and black paper to create eyes.
- Draw or cut out small black ears and attach them on each side of the head.
- Insert the lollipop stick through a small hole or secure it so that the red wrapper sits in the round nose area.
#6. Rustic Cardboard Christmas Stars

I love how these simple yet stylish cardboard stars bring a natural, eco-friendly touch to any Christmas decor. They’re minimalistic, versatile, and so easy to make!
Supplies
- recycled cardboard
- pencil
- scissors or craft knife
Instructions
- Draw two identical star shapes on the cardboard and cut them out.
- On one star, cut a slot from the top point to the center. On the other star, cut a slot from the bottom point to the center.
- Slide the two stars together through the slots, forming a 3D shape.
#7. Charming Layered Cardboard Tree
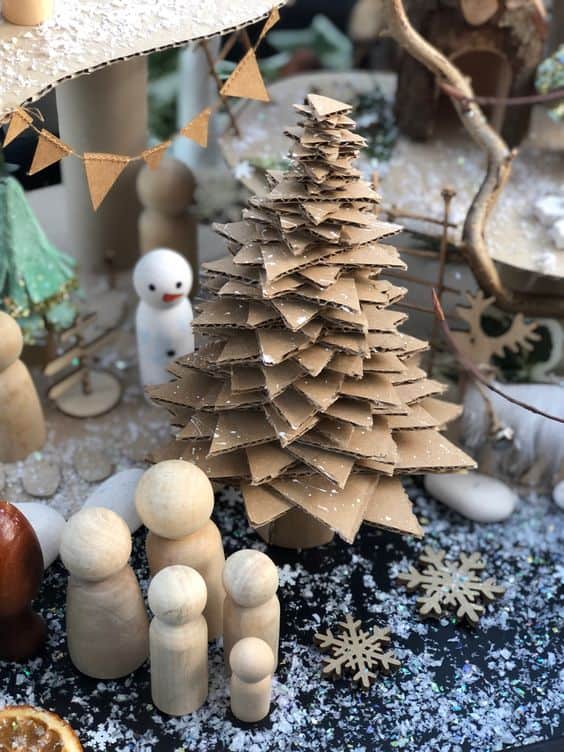
On your holiday table, this charming layered cardboard tree will steal the show.
Supplies
- recycled cardboard
- pencil
- scissors or craft knife
- wooden skewer or stick
- glue
- white paint or glitter
Instructions
- Cut out multiple cardboard squares of various sizes, gradually getting smaller as you go up the tree.
- Poke a small hole in the center of each square.
- Stack the squares on a skewer, starting with the largest at the bottom and working up to the smallest, twisting each piece slightly to give a layered, tree-like effect.
- If desired, dab a bit of white paint or sprinkle glitter on the edges for a snowy touch.
#8. Adorable Gingerbread Cardboard Ornaments

These cute gingerbread cardboard ornaments are a delightful way to bring festive cheer to your holiday decor.
Supplies
- recycled cardboard
- pencil
- scissors
- brown paint or marker
- white, black, pink, and red markers or paint
- small bows
- glue
- string or ribbon for hanging
Instructions
- Draw a gingerbread man shape on the cardboard and cut it out.
- Paint or color the cardboard brown.
- Use white paint or marker to add the squiggly “icing” lines on the arms and legs.
- Draw on the face: black eyes, a red smiling mouth, and pink cheeks.
- Add two or three “buttons” in the center using colored markers or paint.
- Glue a small bow near the neck area.
- Attach a loop of string or ribbon to the top for hanging.
#9. Geometric Cardboard Christmas Tree

This creative geometric cardboard Christmas tree adds a modern, eco-friendly touch to your holiday decor.
Supplies
- large pieces of recycled cardboard
- pencil
- ruler
- scissors or box cutter
- tape or glue
- paint or markers (optional)
Instructions
- Using the pencil and ruler, draw three large equilateral triangles of different sizes on the cardboard.
- Cut out each triangle carefully.
- Fold each triangle into a pyramid shape by bringing the edges together and securing them with tape or glue. E
- Stack the pyramids on top of each other from largest to smallest to create the tree shape.
- (Optional) Paint or decorate your tree as desired for a festive touch.
#10. Santa’s Cozy Laundry Scene Craft
If you have ever wondered where Santa airs his winter gear, this charming cardboard craft brings that imagination to life!
With cute miniature clotheslines and snowy scenery, it’s a fun, creative way to celebrate the holidays!
Supplies
- recycled cardboard
- scissors
- pencil
- white paint or markers
- small clothespins
- red string or yarn
- glue
Instructions
- Cut a large rectangle from cardboard as the base. Draw and cut out trees, stars, and a moon, then glue them onto the background.
- Draw Santa’s jacket, pants, hat, mittens, and boots on cardboard. Cut them out and add white accents with paint or markers to mimic fur.
- Attach a piece of red string or yarn across the cardboard, securing it at each end.
- Use small clothespins to “hang” Santa’s clothes on the line.
#11. Frosted Pinecone Ornament Craft

Your holiday decor will sparkle with this elegant frosted pinecone ornament!
Supplies
- recycled cardboard
- scissors
- hot glue gun
- ribbon for hanging
- faux greenery or small berries
- paint or glitter
- Instructions
- Draw and cut small oval or petal-shaped pieces from cardboard to mimic pinecone scales.
- Starting from the bottom, hot glue each cardboard piece onto a cone or egg shape (or layered on themselves if forming a loose cone), overlapping slightly to create a layered effect.
- Lightly brush the edges with glue and sprinkle glitter or add a touch of white paint for a snowy effect.
- Glue a looped ribbon to the top for hanging. Decorate with small faux leaves or berries if desired.
#12. Corrugated Snowman Ornaments
With their cheerful faces and adorable hats, these corrugated snowman ornaments are a fun, eco-friendly way to decorate for the holidays.
Supplies
- corrugated cardboard
- scissors
- white, black, orange, and red paint
- fine-tipped black marker
- paintbrush
- glue
- wire or ribbon for hanging
- optional glitter for added sparkle
Instructions
- Cut out two circles from corrugated cardboard, one for the snowman’s face and one for the hat. Trim the hat shape to fit on top of the face.
- Paint the snowman’s face white, the hat black or red, and a small triangular piece orange for the nose.
- Use a black marker to draw eyes and a smile on the snowman’s face.
- Glue the hat to the top of the snowman’s face. Attach the orange nose in the center.
- Brush a thin layer of glue on parts of the snowman and sprinkle with glitter for a frosty look.
- Glue a wire or ribbon loop to the back for hanging.
#13. Rustic Cardboard Cottage

In cold weather, nothing beats crafting your very own rustic cardboard cottage.
With its intricately designed roof and chimney, this charming craft brings a cozy, magical touch to your holiday décor, evoking storybook vibes.
Supplies
- large pieces of cardboard
- box cutter or craft knife
- Ruler
- hot glue gun
- pencil
- cutting mat (optional)
- fine-tip marker for details
Instructions
- Cut a large rectangle for the base of the house. For walls, cut cardboard pieces into rectangles according to the desired height of each wall.
- Attach the walls to the base using hot glue. Cut out windows and doors from the wall pieces before gluing.
- Cut triangular pieces for the roof gables. Attach these to the tops of the walls, then add roof panels on each side, securing with glue.
- Use thin strips of cardboard to create shingles for the roof, layering them with glue. Cut small rectangles and squares to design window frames, shutters, and additional architectural details.
- Make a small box for the chimney and attach it to the roof. Add textured cuts to resemble brickwork.
- Draw in finer details like wood grain and trim with a marker to enhance the rustic look.
#14. Glistening Cardboard Star Ornaments
You can light up your holiday décor with these glistening cardboard star ornaments.
Supplies
- corrugated cardboard
- star template
- scissors or craft knife
- hole punch
- gold or silver glitter
- glue
- string or twine
Instructions
- Use the star template to trace star shapes onto the corrugated cardboard.
- Punch a small hole near the top of each star for threading the string later.
- Apply glue on the surface of the stars, focusing on the edges or wherever you want the glitter effect. Sprinkle glitter over the glue, then shake off any excess.
- Once the glue is dry, thread a piece of string or twine through the hole and tie a knot to create a loop for hanging.
#15. Sparkly Cardboard Ornaments
With colorful pom-poms, ribbons, and vibrant glitter designs, these pieces bring a joyful pop to any Christmas décor.
Supplies
- recycled cardboard
- scissors
- hole punch
- glitter glue or glitter tubes
- small pom-poms (optional)
- colorful ribbons
- glue
- markers or paint (optional for background color)
- string or twine for hanging
Instructions
- Use scissors to cut shapes (stars, circles, or other designs) from the cardboard.
- Apply glitter glue in patterns, like snowflakes or abstract designs. You can also add small pom-poms for extra decoration.
- Attach colorful ribbons to the bottom of the shapes with glue for a festive touch.
- Use a hole punch near the top and thread a piece of string or twine through it to make a hanging loop.
- Add any extra designs or color accents with markers or paint if desired.
#16. Glittery Reindeer Roll Crafts

These adorable reindeer, made from recycled toilet paper rolls, perfect for kids to create.
Supplies
- empty toilet paper rolls
- brown craft paper or paint
- googly eyes
- red or gold pom-poms for noses
- glittery paper
- glue
- scissors
Instructions
- Cover the toilet paper roll with brown craft paper or paint it brown. Let it dry if you use paint.
- Cut small arches at the bottom of the roll on opposite sides to form the reindeer’s legs.
- Cut a small oval or rounded shape from brown paper for the face. Attach googly eyes and a pom-pom for the nose.
- Cut antler shapes from glittery paper and glue them to the back of the face.
- Attach the face to the top of the roll, ensuring the antlers stand up behind it.
#17. Twinkling Reindeer Cardboard Decoration

The bright red nose and playful eyes bring an instant smile, making this festive cardboard reindeer a joyful and eco-friendly addition to your Christmas decor.
Supplies
- cardboard
- red and black markers or paint
- googly eyes
- pink paint or marker
- red pom-poms or pipe cleaners
- decorative string lights or tinsel garland
- scissors
- glue
- hole punch and string
Instructions
- Draw and cut out a large reindeer face and two ear shapes from cardboard.
- Use paint or markers to color the nose red, add a smile with black, and draw pink cheeks. Attach googly eyes above the nose.
- Glue the ears on either side of the face, angled slightly outward.
- Twist pipe cleaners, tinsel, or small lights to create festive antlers and attach them to the top of the reindeer’s head.
- Punch a hole at the top, thread a string through, and hang your reindeer.
#18. Whimsical Angel Cardboard Ornament

Adorned with a delicate halo and holding a heart, the peaceful smile of this sweet cardboard angel brings a calming charm.
Supplies
- corrugated cardboard
- scissors
- glue
- black marker
- white paint or small star stickers
- optional: Gold marker or glitter for the halo
Instructions
- Cut out the angel’s body, wings, heart, and head from corrugated cardboard. Also, cut a halo shape if desired.
- Glue the wings behind the body and attach the heart to the front. Place the head above the body.
- Use the black marker to draw the angel’s face and other small details, like the neckline or dress accents.
- Add star stickers or white paint dots on the dress for a festive touch. Use a gold marker or glitter on the halo for a bit of sparkle.
#19. Charming Snowflake Tissue Box House
Crafted from recycled cardboard, its cozy chimney design and delicate snowflake patterns make this idea a perfect winter decoration.
Supplies
- cardboard box (large enough to hold a tissue box)
- additional cardboard for the chimney
- white paint or marker
- scissors
- glue
Instructions
- Choose a cardboard box that fits around a tissue box, allowing the tissues to be pulled from the top.
- Cut a separate piece of cardboard into two triangles and rectangles for the roof. Attach the roof pieces to the top of the box with glue.
- Cut a small cardboard strip, roll it into a tube, and attach it to the roof as the chimney.
- Use white paint or markers to draw snowflakes and holiday patterns on all sides.
- Place the tissue box inside, letting the tissues pop out of the chimney.
#20. Whimsical Cardboard Forest and Reindeer
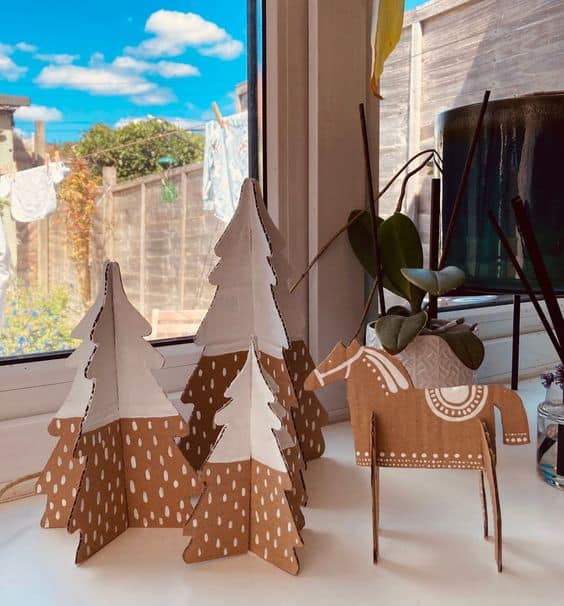
With their playful dotted patterns and eco-friendly appeal, these simple yet artistic pieces bring a warm, natural touch to your holiday décor.
Supplies
- recycled cardboard
- white paint or white marker
- scissors
- pencil
Instructions
- Sketch a few tree shapes and a reindeer figure onto the cardboard. Make two tree pieces for each tree, and cut a slot halfway down each one to interlock them for a 3D effect.
- Carefully cut out the trees and reindeer.
- Use white paint or marker to add simple designs, such as dots on the trees for a snowy effect and patterns on the reindeer for added charm.
- Slide the tree pieces together and place them upright.
#21. Festive Cardboard Christmas Village
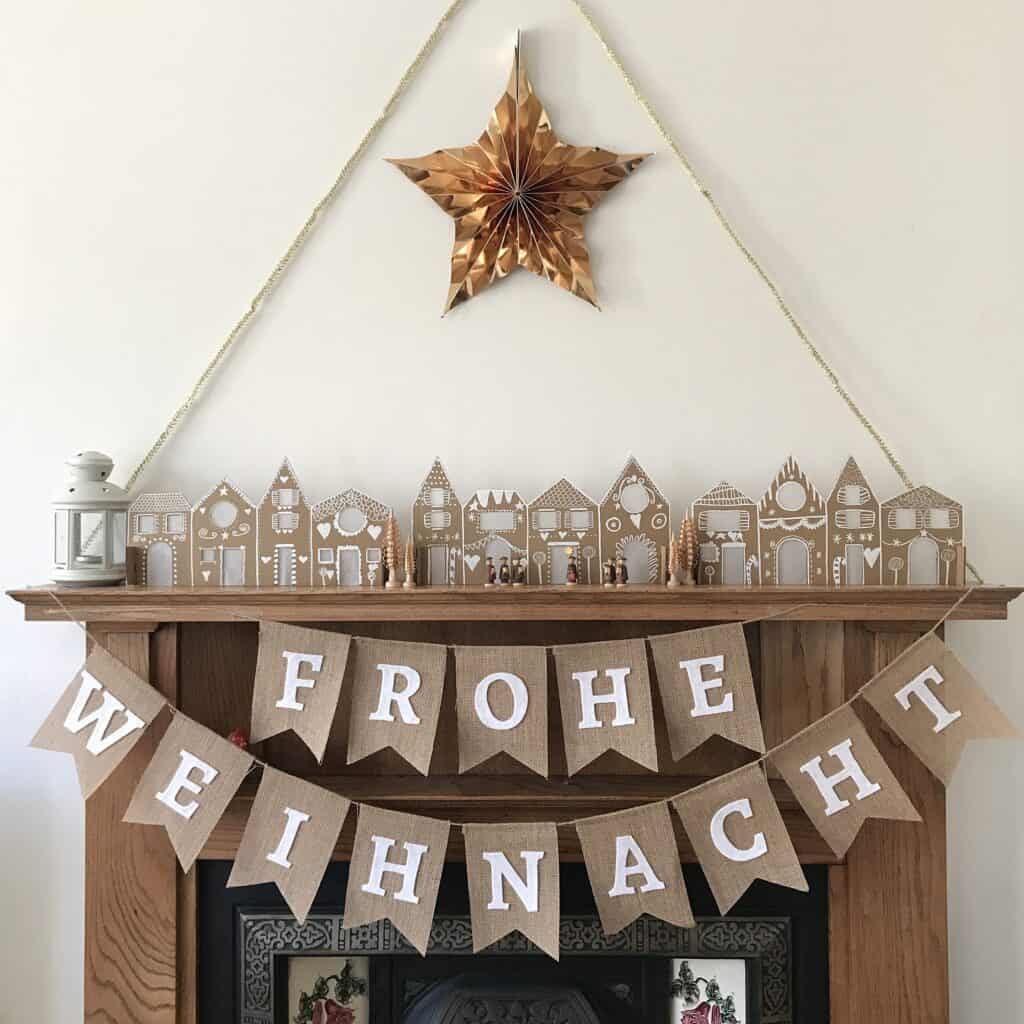
Your mantelpiece will glow with this delightful recycled cardboard Christmas village.
Supplies
- recycled cardboard
- precision craft knife or scissors
- white paint or white marker
- string lights (optional)
Instructions
- Sketch simple house shapes with windows, doors, and roofs on the cardboard.
- Carefully cut out the houses and their details.
- Decorate the houses with white paint or marker to create snow, bricks, and decorative patterns around windows and doors.
- Line up the houses on a mantel or shelf.
#22. Reindeer Pyramid Duo
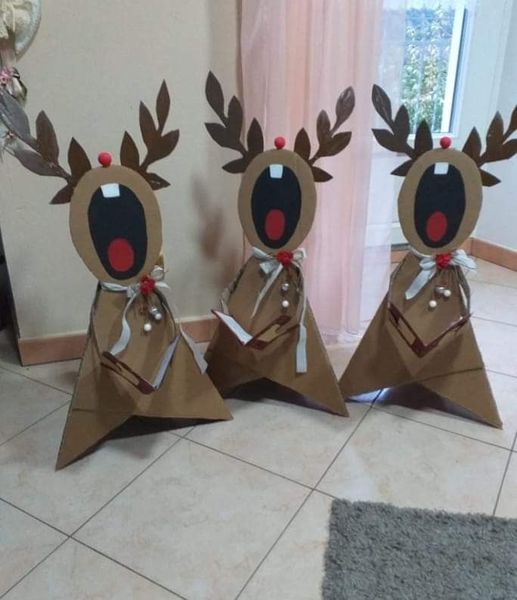
I love how this recycled cardboard craft uses simple shapes to bring these cute reindeer to life.
Supplies
- recycled cardboard
- scissors
- red and black markers
- glue
- craft knife
- brown paint or marker
Instructions
- Cut out a triangular shape with slits at regular intervals to create the reindeer’s body.
- Cut two circular shapes for the face and smaller pieces for the ears. For the antlers, draw a design on cardboard, cut it out, and paint or color them brown.
- Draw eyes and a smile on the face. Use a red marker to add a nose and black for facial details.
- Attach the face and ears to the top of the body triangle. Glue the antlers behind the face.
#23. Winter Mittens Wonderland
If you’re dreaming of a cozy winter wonderland, these delicate recycled cardboard mittens are the perfect touch.
Supplies
- recycled cardboard
- white paint or a white marker
- lace or decorative doilies
- small embellishments (snowflakes, beads, small flowers)
- jute string or ribbon
- glue
- scissors
Instructions
- Draw and cut out two mitten shapes from cardboard.
- Use white paint or a marker to create a knitted pattern on the cardboard mittens.
- Glue pieces of lace or doilies onto each mitten. Add snowflake embellishments, small beads, or faux flowers to give it a cozy, wintery feel.
- Glue a piece of jute string or ribbon to the back of each mitten for hanging.
#24. Winter Woodland Rabbits
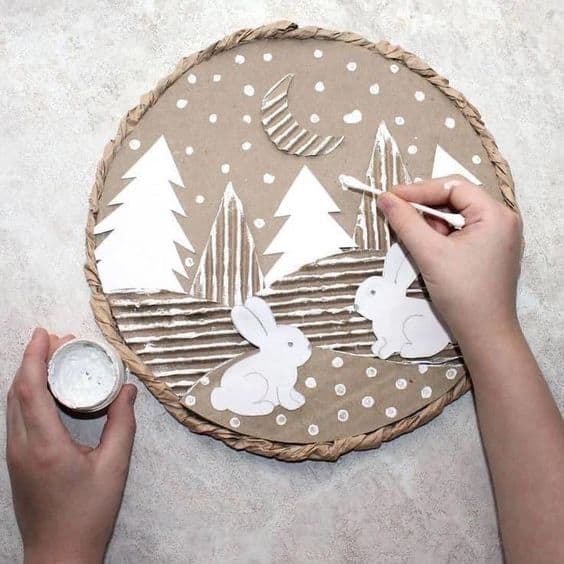
I love how this serene winter woodland scene brings together gentle rabbits and a snowy forest, all created from recycled cardboard.
Supplies
- recycled cardboard
- white paint or a white marker
- twine or brown paper for border decoration
- glue
- scissors
- cotton swab or paintbrush
Instructions
- Cut a circular piece of cardboard as the base. Twist a long piece of brown paper or twine to glue around the edge, creating a frame.
- From cardboard, cut small trees, hills, a moon, and two bunnies. Glue these onto the circular background, arranging them into a scenic layout.
- Use white paint or a marker to add snowy details on the trees, ground, and moon. Dot snowflakes around the scene with a cotton swab dipped in white paint.
#25. Festive Corrugated Snowman
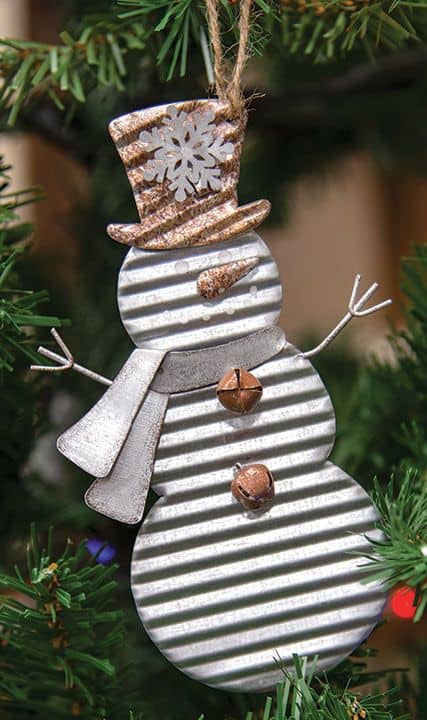
For the perfect rustic charm, this snowman ornament crafted from recycled cardboard steals the show.
Supplies
- corrugated cardboard
- white and brown paint
- small decorative items (like jingle bells, tiny buttons, or embellishments)
- twine
- glue
- scissors
- paintbrush
Instructions
- Use corrugated cardboard to cut out two or three circles of varying sizes for the snowman’s body. Glue them together to form the snowman shape.
- Paint the cardboard white, adding a light dusting of brown for a vintage look.
- Paint a small top hat shape and add any decorative embellishments like snowflakes or stars.
- Attach small items as buttons, a scarf cut from fabric or cardboard, and wire or twigs for arms.
- Glue or tape a piece of twine to the top of the snowman’s head for hanging.
